3rd party libraryを使う

Lightning Web ComponentでサードパーティJavaScriptライブラリを使う方法について簡単にまとめました。

tamuです。

Lightning Web ComponentでサードパーティJavaScriptライブラリを使う方法について簡単にまとめました。

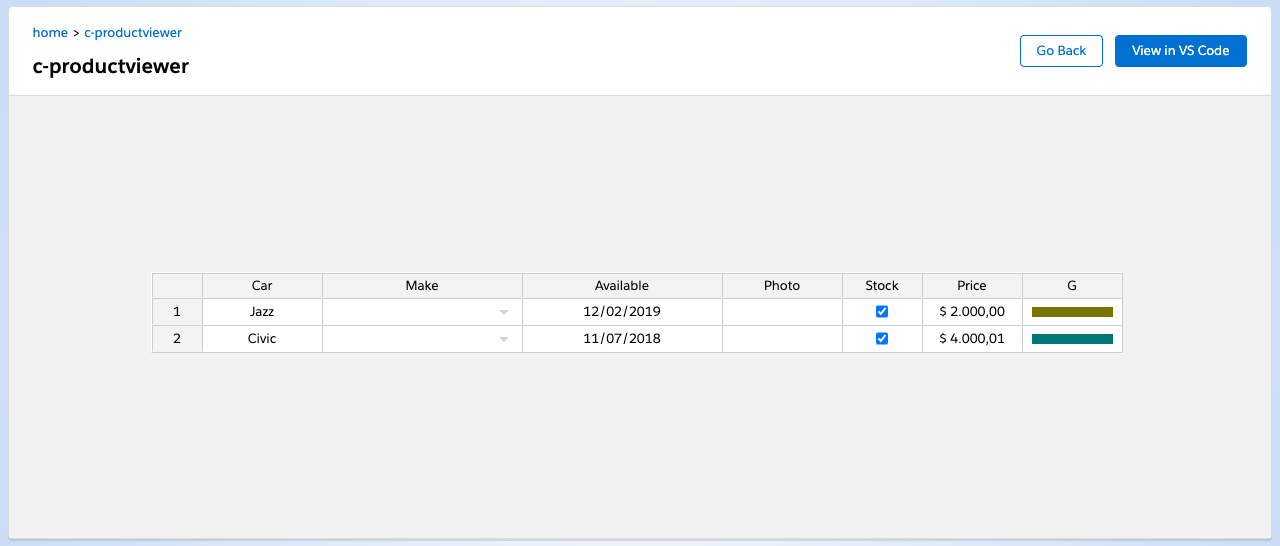
今回はスプレッドシート風の表示をしてくれるライブラリを使ってみます。 「エクセルみたいに複数のレコードを編集したい」っていう声、昔からありましたよね。

準備

Lightning Web ComponentでサードパーティJavaScriptライブラリを使うには、静的リソース(static resource)経由で使う必要があります。 まずはJavaScriptライブラリをダウンロードしてきます。

ダウンロード

必要な外部ライブラリは次のとおりです。

配置

ダウンロードしてきたファイルを staticresources に配置します。 今回はディレクトリをそれぞれで作ってます。

staticresources 下に jspreadsheet ディレクトリを掘り、その下に jspreadsheet からダウンロードしたファイルを配置します。 同じように、 jsuites ディレクトリを掘り、その下に jsuites からダウンロードしたファイルを配置します。

※ 今回はわけてますが、同じディレクトリに入れても問題なし

1
2
3
4
5
6
7
|____staticresources
| |____jspreadsheet
| | |____index.js
| | |____jspreadsheet.css
| |____jsuites
| | |____jsuites.js
| | |____jsuites.css

続いて staticresources 下にメタ情報を配置します。

jspreadsheet.resource-meta.xml

1
2
3
4
5
<?xml version="1.0" encoding="UTF-8"?>
<StaticResource xmlns="http://soap.sforce.com/2006/04/metadata">
    <cacheControl>Private</cacheControl>
    <contentType>application/zip</contentType>
</StaticResource>

jsuites.resource-meta.xml

1
2
3
4
5
<?xml version="1.0" encoding="UTF-8"?>
<StaticResource xmlns="http://soap.sforce.com/2006/04/metadata">
    <cacheControl>Private</cacheControl>
    <contentType>application/zip</contentType>
</StaticResource>

どっちも同じで大丈夫です。

これでサードパーティJavaScriptライブラリを使えるようになりました。

ライブラリの読み込み

静的リソースへのアクセス(https://developer.salesforce.com/docs/component-library/documentation/ja-jp/lwc/lwc.create_resources) では画像ファイルを使っていますが、今回はJavaScriptファイルを読み込む必要があります。

まずは動いているソースを掲載します。

 1
 2
 3
 4
 5
 6
 7
 8
 9
10
11
12
13
14
15
16
17
18
19
20
21
22
23
24
25
26
27
28
29
30
31
32
33
34
35
36
37
38
39
40
41
42
43
44
45
46
47
48
49
50
51
52
53
54
55
56
57
58
59
60
61
62
63
64
65
66
67
68
69
70
71
import { LightningElement } from 'lwc';
import { ShowToastEvent } from 'lightning/platformShowToastEvent'; // エラー表示用
import { loadScript, loadStyle } from 'lightning/platformResourceLoader'; // スクリプト読み込み

// static resources
import SpreadsheetFiles from '@salesforce/resourceUrl/jspreadsheet';
import JsuitesFlies from '@salesforce/resourceUrl/jsuites';

export default class Productviewer extends LightningElement {

  /**
   * @type {boolean} initialized 初期化済みかどうかを表す
   */
  initialized = false;


  /**
   * @type {Array} data サンプルデータ
   */
  data = [
    ['Jazz', 'Honda', '2019-02-12', '', true, '$ 2.000,00', '#777700'],
    ['Civic', 'Honda', '2018-07-11', '', true, '$ 4.000,01', '#007777'],
  ];

  renderedCallback() {
    if (this.initialized) {
      return;
    }
    this.initialized = true;

    // 初回だけ読み込み
    Promise.all([
      loadScript(this, SpreadsheetFiles + '/index.js'),
      loadStyle(this, SpreadsheetFiles + '/jspreadsheet.css'),
      loadScript(this, JsuitesFlies + '/jsuites.js'),
      loadStyle(this, JsuitesFlies + '/jsuites.css'),
    ]).then(() => {
      this.initializeUI();
    }).catch(error => {
      console.log(error);
      this.dispatchEvent(
        new ShowToastEvent({
          title: 'Error Loading Spreadsheet Library',
          message: 'error',
          variant: 'error'
        })
      )
    });
  }


  /**
   * 表示部分の初期化処理
   */
  initializeUI() {
    const ss = this.template.querySelector('div');

    jspreadsheet(ss, {
      data: this.data,
      columns: [
        { type: 'text', title: 'Car', width: 120 },
        { type: 'dropdown', title:'Make', width:200, source:[ "Alfa Romeo", "Audi", "Bmw" ] },
        { type: 'calendar', title:'Available', width:200 },
        { type: 'image', title:'Photo', width:120 },
        { type: 'checkbox', title:'Stock', width:80 },
        { type: 'numeric', title:'Price', width:100, mask:'$ #.##,00', decimal:',' },
        { type: 'color', width:100, render:'square', },
      ]
    });
  }
}

URLの取得

1
import SpreadsheetFiles from '@salesforce/resourceUrl/jspreadsheet'

これで jspreadsheet が格納されているURLを取得しています。

このあと読み込みです。

JS, CSSの読み込み

1
2
3
4
5
renderedCallback() {
  if (this.initialized) {
    return;
  }
  this.initialized = true;

ライブラリを読み込むタイミングは、コンポーネントの表示が完了したあとです。

1
2
3
4
5
6
Promise.all([
  loadScript(this, SpreadsheetFiles + '/index.js'),
  loadStyle(this, SpreadsheetFiles + '/jspreadsheet.css'),
  loadScript(this, JsuitesFlies + '/jsuites.js'),
  loadStyle(this, JsuitesFlies + '/jsuites.css'),
])

loadScript でJSを、 loadStyle でCSSを読み込みます。

1
2
3
.then(() => {
  this.initializeUI();
})

読み込みが完了したらUIを構築してきます。 ここからはライブラリ側の処理です。

 1
 2
 3
 4
 5
 6
 7
 8
 9
10
.catch(error => {
  console.log(error);
  this.dispatchEvent(
    new ShowToastEvent({
      title: 'Error Loading Spreadsheet Library',
      message: 'error',
      variant: 'error'
    })
  )
});

読み込み失敗時は画面に何か出して終了です。

ライブラリの処理

まずはJspreadsheetのサンプルコードをそのまま記載して、動くことを確認していきます。

 1
 2
 3
 4
 5
 6
 7
 8
 9
10
11
12
13
14
15
16
initializeUI() {
  const ss = this.template.querySelector('div');

  jspreadsheet(ss, {
    data: this.data,
    columns: [
      { type: 'text', title: 'Car', width: 120 },
      { type: 'dropdown', title:'Make', width:200, source:[ "Alfa Romeo", "Audi", "Bmw" ] },
      { type: 'calendar', title:'Available', width:200 },
      { type: 'image', title:'Photo', width:120 },
      { type: 'checkbox', title:'Stock', width:80 },
      { type: 'numeric', title:'Price', width:100, mask:'$ #.##,00', decimal:',' },
      { type: 'color', width:100, render:'square', },
    ]
  });
}

ここまでやって、テンプレートは div だけを用意します。

1
2
3
<template>
    <div></div>
</template>

これをローカルで動かすと下のようになります。

jspreadsheetを動かした様子

Salesforce上で動かすにはまだいくつか調整が必要なので次回やります。

まとめ

  • 外部ライブラリは一度ダウンロードする必要がある
  • renderが終わったあとにライブラリを読み込む
  • その後は普通にライブラリ側を操作する
Built with Hugo
Theme Stack designed by Jimmy